วันอังคารที่ 13 สิงหาคม พ.ศ. 2556

TSMessages

This framework provides an easy to use class to show little notification views on the top of the screen. (à la Tweetbot).
The notification moves from the top of the screen underneath the navigation bar and stays there for a few seconds, depending on the length of the displayed text. To dismiss a notification before the time runs out, the user can swipe it to the top or just tap it.
There are 4 different types already set up for you: Success, Error, Warning, Message (take a look at the screenshots)
It is very easy to add new notification types with a different design. Add the new type to the notificationType enum, add the needed design properties to the configuration file and set the name of the theme (used in the config file and images) in TSMessagesView.m inside the switch case.
Take a look at the Example project to see how to use this library. You have to open the workspace, not the project file, since the Example project uses cocoapods.


วันจันทร์ที่ 12 สิงหาคม พ.ศ. 2556

NJKWebViewProgress: progress for webview

NJKWebViewProgress is a progress interface library for UIWebView. Currently, UIWebView don't have official progress interface. You can implement progress bar for your in-app browser using this module.


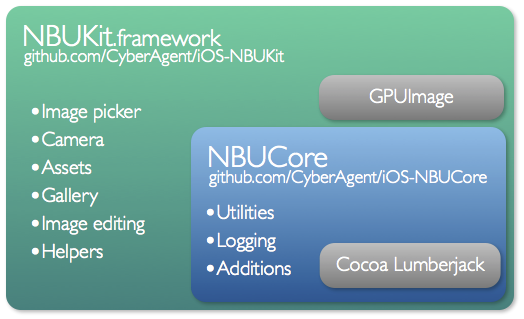
iOS-NBUKit: Component For Working With Photos Providing A Camera View, Gallery, Image Filter View, And More

Customizable camera, assets, image editing, gallery, picker and UIKit subclasses.

faceimageview - A UIImageView clone that adjusts image content to show faces.

UIImageView clone with a catch:

FaceImageView automatically scales its image to fill the bounds and keep any faces detected in view. This can be useful if you want to display people-based dynamic content with UIViewContentModeScaleToFill but are having issues with it displaying the wrong part of the image, like the background, or someone's feet.

The class uses the CoreImage face detection APIs available in iOS 5.0 or later. This API works in many clear cases, but is not all that reliable. If no faces are detected in an image, FaceImageView defaults to centering the image, like UIImageView's behavior with UIViewContentModeScaleToFill.

A small demo app is included to try out different images and view sizes.
https://github.com/dingbat/faceimageview

RNBlurModalView


RNBlurModal adds depth to the traditional modal/alert view. Calling the view is incredibly similar to setting up and showing a UIAlertView. You can also setup your own custom views and display them with a blurry background. The goal is to truly draw the user's focus directly to your alert using natural effects. This project works on all iOS devices at all orientations with ARC.

✔Sources: https://github.com/rnystrom/RNBlurModalView

วันศุกร์ที่ 28 มิถุนายน พ.ศ. 2556

รับสอน web , mobile app

หารายได้เสริม รับสอน รับปรึกษาโปรเจคจบ( แต่ไม่ทำให้ )

Web Developer Training Courses 1:1

HTML5 : ชม. ละ 150 บาท
CSS3 : ชม. ละ 150 บาท
PHP + SQL : ชม. ละ 300 บาท
JavaScript + jQuery: ชม. ละ 300 บาท
NodeJS : ชม. ละ 300 บาท

Mobile Developer Training Courses 1:1

iOS Apps Objective-C Basic : ชม. ละ 300 บาท
iOS Apps Objective-C Adv : ชม. ละ 400 บาท
Android Apps Java Basic : ชม. ละ 300 บาท
Android Apps Java Adv : ชม. ละ 400 บาท

contact me ---- http://www.aommiez.com/ ^___^

ปล.ลืมบอก ว่าผมเข้าหัวสายแลนไม่เป็นนะครับ T_T

ปล2. ไม่รับงานที่ต้องนั่ง Onsite หรือนั่งที่บริษัท Full-Time นะครับ ด้วยเหตุผลส่วนตัว แต่ถ้า Remote ได้ ไม่มีปัญหาครับ

วันศุกร์ที่ 10 พฤษภาคม พ.ศ. 2556

RHEL / Centos 6: Install Nginx Using Yum Command

CentOS Linux v6.x user type the following command:
# wget http://nginx.org/packages/centos/6/noarch/RPMS/nginx-release-centos-6-0.el6.ngx.noarch.rpm
# rpm -ivh nginx-release-centos-6-0.el6.ngx.noarch.rpm

RHEL v6.x user type the following command:
# wget http://nginx.org/packages/rhel/6/noarch/RPMS/nginx-release-rhel-6-0.el6.ngx.noarch.rpm
# rpm -ivh nginx-release-rhel-6-0.el6.ngx.noarch.rpm
Type the following yum command to install nginx web-server:
# yum install nginx

Step #3: Turn on nginx service

Type the following command:
# chkconfig nginx on

How do I start / stop / restart nginx web-server?

Type the following commands:
# service nginx start
# service nginx stop
# service nginx restart
# service nginx status
# service nginx reload

Step #4: Configuration files

  1. Default configuration directory: /etc/nginx/
  2. Default SSL and vhost config directory: /etc/nginx/conf.d/
  3. Default log file directory: /var/log/nginx/
  4. Default document root directory: /usr/share/nginx/html
  5. Default configuration file: /etc/nginx/nginx.conf
  6. Default server access log file: /var/log/nginx/access.log
  7. Default server access log file: /var/log/nginx/error.log
To edit the nginx configuration file, enter:
# vi /etc/nginx/nginx.conf
Set or update worker_processes as follows (this must be set to CPU(s) in your system. Use thelscpu | grep '^CPU(s)' command to list the number of CPUs in the server)
worker_processes  2;
Turn on gzip support:
gzip  on;
Save and close the file. Edit the file /etc/nginx/conf.d/default.conf, enter:
# vi /etc/nginx/conf.d/default.conf
Set IP address and TCP port number:
    listen       202.54.1.1.1:80;
Set server name:
    server_name  www.cyberciti.biz;
Save and close the file. Start the server:
# service nginx start
Verify that everything is working:
# netstat -tulpn | grep :80
# ps aux | grep nginx

Firewall configuration: Open TCP port # 80

Edit the file /etc/sysconfig/iptables, enter:
# vi /etc/sysconfig/iptables
Add the following lines, ensuring that they appear before the final LOG and DROP lines for the INPUT chain to open port 80:
 
-A INPUT -m state --state NEW -p tcp --dport 80 -j ACCEPT
 
Save and close the file. Finally, restart the firewall:
# service iptables restart

http://www.cyberciti.biz/faq/install-nginx-centos-rhel-6-server-rpm-using-yum-command/